Restoring Your Family Fortress: Expert Back Glass Replacement for the 2018-2027 Honda Odyssey
The 2018-2027 Honda Odyssey is universally celebrated as the ultimate family sanctuary on wheels. From its innovative Magic Slide second-row seats to its whisper-quiet cabin, every inch of this premium minivan is designed to protect and comfort your most precious cargo. However, when a stray rock, a severe weather event, or a sudden impact shatters your rear window, that sanctuary is instantly compromised. Unlike a cracked windshield, a shattered back glass entirely exposes your vehicle’s interior to the elements, creates a severe hazard with thousands of sharp pieces, and disables critical components like your rear defroster and wiper system. As a Master Technician at AlexWindshield, I understand that replacing the back glass on this sophisticated vehicle is not just about installing a new piece of glass—it is about meticulous debris removal, precise electronic integration, and structural integrity.
Premium Mobile Auto Glass Services Across the Greater Toronto Area (GTA)
Driving a minivan with a blown-out rear window is not just uncomfortable; it is incredibly dangerous and often illegal due to impaired visibility and the risk of flying debris. That is exactly why AlexWindshield brings the repair shop directly to your driveway. We provide comprehensive, fully equipped mobile auto glass services across the entire Greater Toronto Area (GTA).
Whether you are parked at a residential driveway in Vaughan, at your workplace in Richmond Hill, or running errands in Markham, our specialized mobile technician units arrive on-site with the exact OEM-quality glass your 2018-2027 Honda Odyssey requires. Our local expertise means we understand the harsh Canadian weather fluctuations in the GTA—from freezing winter temperatures to humid summer heatwaves—and we strictly use climate-appropriate, premium adhesives that cure safely in any environment, ensuring your vehicle is road-ready the moment we hand back the keys.
The Technical Complexity of the Honda Odyssey Rear Window
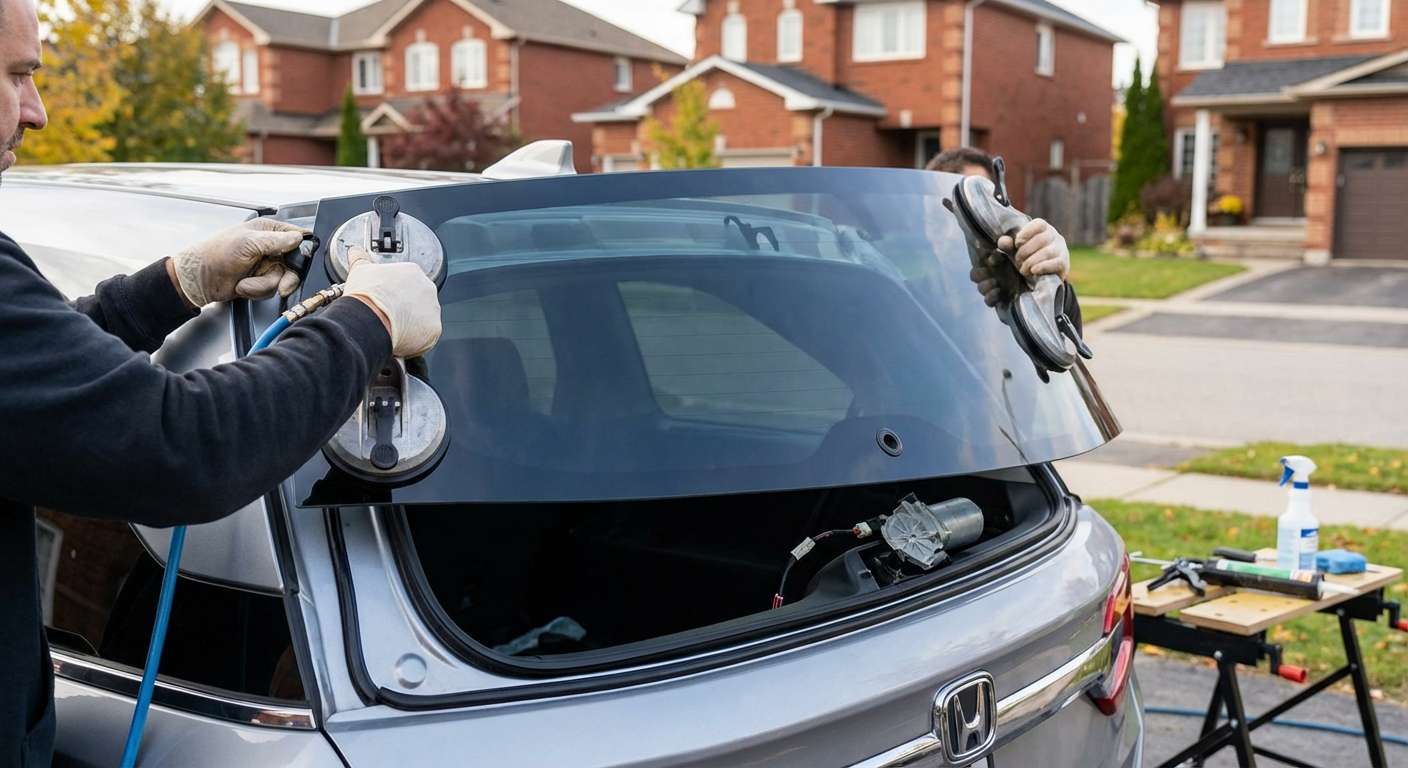
The back glass of the 5th generation Honda Odyssey is a highly complex automotive component. It is manufactured from specialized tempered glass, which is designed to shatter into tiny, blunt, pebble-like pieces upon impact to prevent severe lacerations. Additionally, this specific glass panel features deep factory privacy tint, an embedded thermal defroster grid, and a precise cutout for the rear wiper motor assembly. Because it is mounted to an automated power liftgate, any added weight from improper adhesives or trapped glass shards inside the door cavity can trigger sensor malfunctions and burn out the liftgate motor. Precision is absolutely mandatory.
Our Master Technician Step-by-Step Replacement Process
At AlexWindshield, we do not cut corners. Our A-to-Z back glass replacement protocol guarantees that your Honda Odyssey is restored to its exact factory specifications. Here is how we execute the job with surgical precision:
Step 1: Vehicle Preparation and Interior Protection
The process begins with protecting your family's space. We carefully lay down heavy-duty protective blankets and drop cloths over the exterior bumper, the rear cargo area, and the third-row seating. Because tempered glass explodes upon impact, microscopic glass dust and shards often scatter throughout the rear cabin. We ensure that our work area is completely isolated so no further damage occurs to your leather or cloth upholstery, and your Odyssey's interior remains spotless.
Step 2: Liftgate Interior Door Panel Removal and Intensive Shard Vacuuming
This is the most critical and often overlooked step in a professional back glass service. When the rear window shatters, thousands of glass fragments fall directly into the cavity of the rear tailgate. We meticulously execute the removal of door panels, carefully detaching the interior plastic trim of the power liftgate using specialized non-marring nylon pry tools to prevent breaking any factory retaining clips.
Once the inner mechanics of the tailgate are exposed, we begin the exhaustive process of vacuuming all broken glass shards from the vehicle's interior and the intricate spaces inside the liftgate frame. If these shards are not completely removed, they will rattle aggressively every time you hit a bump, and worse, they can jam the Odyssey’s electronic latch mechanism or burn out the rear wiper motor. We use high-powered industrial vacuums with specialized micro-nozzles to extract every single piece of debris.
Step 3: Component Disconnection and Removal of the Old Glass
Before any cutting begins, our technicians carefully disconnect the rear wiper arm assembly, the wiper motor, and the electronic wiring harnesses that power the rear defroster grid. Once the hardware is safely out of the way, we use professional cold knife tools and wire-cutting systems to slice through the original, hardened factory urethane. We remove the remaining broken glass frame and trim the old adhesive down to a thin, even layer of about 1 to 2 millimeters. This remaining layer acts as an ideal bonding base for the new adhesive.
Step 4: Precision Surface Cleaning and Primer Application
A flawless seal requires a flawless surface. We meticulously clean the vehicle’s pinch weld (the metal frame where the glass sits) using specialized automotive-grade degreasers and alcohol-based solvents to remove all dirt, moisture, and residual glass dust. If there are any minor scratches on the painted pinch weld from the old urethane removal, we treat them immediately to prevent future rust.
Next, we apply an advanced automotive blackout primer application to both the metal pinch weld and the bonding edge of the new back glass. This primer is essential; it acts as a chemical bridge that promotes absolute adhesion while simultaneously protecting the urethane from UV light degradation, ensuring the seal lasts the lifetime of the vehicle.
Step 5: High-Quality Adhesive Application
With the surface primed and prepped, we load a high-viscosity, fast-curing automotive urethane into an electric caulking gun. We apply a perfect, continuous "V-bead" of high-quality adhesive around the entire perimeter of the tailgate frame. The height and width of this urethane bead must perfectly match Honda's factory specifications to ensure there are no wind noises, no water leaks, and that the glass sits at the exact correct depth in relation to the vehicle's body lines.
Step 6: Installing the New Odyssey Back Glass
Handling the heavy, cumbersome back glass of a minivan requires steady hands and specialized equipment. Using heavy-duty pneumatic suction cups, our Master Technicians carefully lift and align the new premium back glass. We lower it onto the fresh urethane bead with pinpoint accuracy. Once the glass makes contact, we gently press it into place, allowing the adhesive to compress and form a watertight, airtight, and structurally sound seal. The glass is then temporarily secured with specialized retention tape to prevent any shifting while the urethane begins its initial flash-cure.
Step 7: Reassembly, Electronic Testing, and Final Cleanup
As the adhesive cures, we reverse the disassembly process. We re-install the rear wiper motor, securely attach the exterior wiper arm, and reconnect the wiring for the thermal defroster. We test all electrical components using a multimeter to guarantee the defroster grid is fully operational. Finally, we snap the interior liftgate trim panels back into place, perform one final vacuuming sweep of your cargo area, and clean the new glass with a streak-free, tint-safe foaming glass cleaner.
Post-Installation Care for Your Honda Odyssey
To guarantee the longevity of your newly installed back glass, we provide strict but simple aftercare instructions. While our fast-curing urethane allows you to safely drive your vehicle shortly after installation, we recommend the following precautions for the first 24 to 48 hours:
- Avoid high-pressure car washes: Allow the urethane to fully chemically cure before subjecting the seal to heavy water pressure.
- Leave your windows cracked: When closing the doors or the power liftgate, air pressure spikes inside the cabin. Leaving a side window open just an inch prevents this air pressure from pushing against the newly curing back glass seal.
- Do not remove the retention tape: Leave the specialized blue tape on the glass for at least 24 hours to ensure the panel does not shift down the pinch weld.
- Avoid slamming doors: Gentle closing of doors and the liftgate ensures the structural integrity of the fresh urethane bead remains undisturbed.
Trust AlexWindshield: Your GTA Auto Glass Experts
When the safety and comfort of your family are on the line, you cannot afford to rely on amateur installations or subpar materials. Replacing the back glass on a 2018-2027 Honda Odyssey demands the specialized knowledge, precision tools, and unwavering dedication to quality that only a Master Technician can provide.
As the leading mobile auto glass specialists in the Greater Toronto Area (GTA), proudly serving communities like Vaughan, Richmond Hill, and Markham, AlexWindshield is committed to delivering unparalleled convenience without ever sacrificing quality. We bring the expertise directly to your doorstep, saving you the time, hassle, and danger of driving a compromised vehicle to a traditional body shop.
Every single replacement we perform is backed by our comprehensive Lifetime Warranty, covering any leaks, wind noise, or workmanship defects for as long as you own your vehicle. Don't let shattered glass disrupt your family's routine. Contact AlexWindshield today for swift, professional, and flawless back glass replacement, and let us restore your Honda Odyssey to its original, factory-perfect condition.




