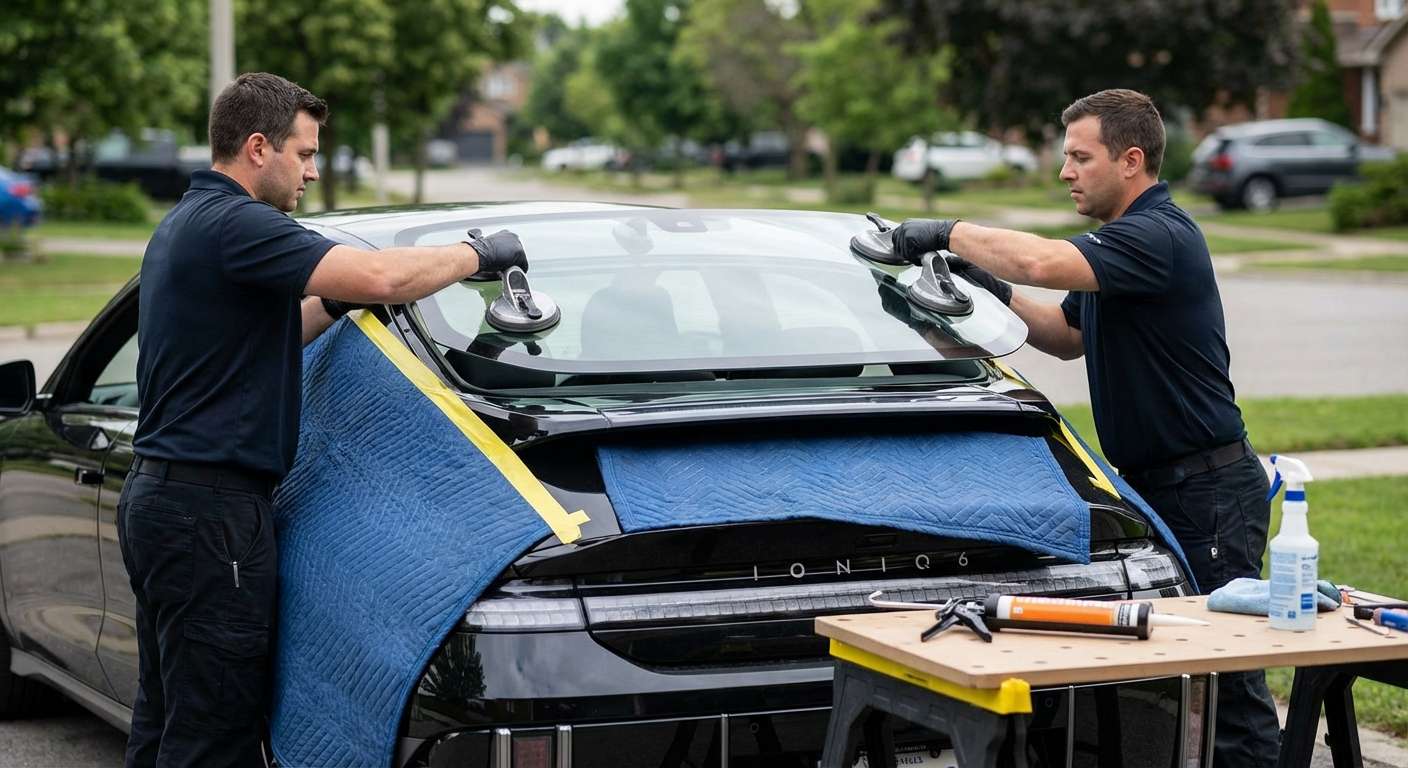
Electrified Aerodynamics: The Hyundai IONIQ 6 Back Glass Challenge
The 2023-2027 Hyundai IONIQ 6 is undeniably one of the most visually striking and aerodynamically efficient electric vehicles on the road today. Dubbed the "Electrified Streamliner," its signature sloping roofline merges seamlessly into a sweeping rear window that drastically reduces wind resistance and maximizes battery range. When this vital, heavily contoured piece of rear glass shatters, it compromises not only the breathtaking aesthetics of your EV but also its cabin acoustics, thermal efficiency, and structural integrity. Unlike a cracked windshield, which is made of laminated glass and typically stays in one piece, the back glass is constructed from tempered safety glass. When compromised, it instantly detonates into thousands of granular shards, exposing your vehicle's pristine interior to the elements.
Replacing the back glass on an advanced EV like the IONIQ 6 is not a standard plug-and-play job. It requires the precision of a Master Technician who understands the unique tailgate curvature, the integrated defroster networks, and the high-voltage proximity safety protocols inherent to modern electric vehicles. At AlexWindshield, we combine state-of-the-art auto glass technology with meticulous craftsmanship to restore your IONIQ 6 to its factory-perfect condition.
Premium Mobile Back Glass Replacement Across the GTA
A shattered rear window creates an immediate driving hazard and leaves your interior vulnerable to weather and theft. Driving an EV to a repair shop with no back glass destroys your cabin's climate control, rapidly draining your battery. That is why AlexWindshield brings our fully equipped, mobile auto glass repair shop directly to your location. We proudly provide expedited, top-tier mobile auto glass services across the Greater Toronto Area (GTA).
Whether you are charging your IONIQ 6 in your driveway in Vaughan, commuting to the office through Richmond Hill, or parked safely at a retail center in Markham, our technicians arrive on-site with all the necessary tools, OEM-quality glass, and premium adhesives to execute a flawless replacement. We understand the local climate of the GTA and utilize specialized, temperature-adaptive urethanes that cure rapidly, ensuring your vehicle is safe to drive shortly after the installation is complete.
Master Technician Breakdown: A-to-Z Hyundai IONIQ 6 Back Glass Replacement
As a Senior SEO Specialist and Master Technician, I believe in absolute transparency. Replacing the back glass on the 2023-2027 Hyundai IONIQ 6 is a highly technical procedure that demands rigorous attention to detail. Here is the exact, step-by-step process we utilize at AlexWindshield to ensure a permanent, watertight, and cosmetically flawless repair.
Step 1: Comprehensive Damage Assessment and Interior Protection
Before any tools are utilized, we perform a thorough inspection of the vehicle's rear end. We examine the tailgate paint, the spoiler assembly, and the rear parcel shelf for collateral damage caused by the impact. To protect your luxurious IONIQ 6 interior, we drape heavy-duty protective blankets over the rear seats, center console, and trunk floor. We also apply high-tack protective tape around the exterior perimeter of the tailgate to safeguard the vehicle's paint from accidental tool strikes during the extraction process.
Step 2: Extensive Glass Clean-Up and Deep Vacuuming
Because the IONIQ 6 back glass is tempered safety glass, a break results in thousands of tiny, sharp cubes scattering throughout the cabin and trunk cavity. This step is critical: we utilize high-powered, industrial shop vacuums fitted with specialized micro-crevice tools to extract every single shard of glass. We thoroughly vacuum the rear passenger seats, the floor mats, the trunk lining, and the hidden crevices between the seatbacks. Leaving even one piece of glass behind is unacceptable, as it can cause injury or create an irritating rattle while driving.
Step 3: Removing Tailgate Panels and Disconnecting Defrosters
To properly install the new glass and access hidden glass shards, we must carefully dismantle the interior tailgate trim panels. Using non-marring nylon pry tools, our technicians expertly remove the plastic paneling on the interior of the IONIQ 6's liftgate without snapping delicate retaining clips. Once the panels are removed, we can vacuum out the glass shards that have fallen down inside the tailgate cavity. We then carefully disconnect the wiring harnesses for the rear window defroster grids and the integrated radio antenna lines, ensuring the connectors are protected from debris.
Step 4: Cutting Out the Remaining Polyurethane Seal
With the perimeter cleared, we must remove the residual urethane adhesive that held the original glass in place. We employ specialized fiber-line cutting systems or advanced cold knife tools to slice through the dense factory polyurethane bead. The fiber-line system is exceptionally safe, utilizing a high-tensile braided string that cuts through the glue from the inside out, completely eliminating the risk of scratching the IONIQ 6's precise pinch weld or damaging the surrounding exterior trim.
Step 5: Pinch Weld Preparation and Cleaning
The foundation of a safe auto glass installation is a perfectly prepped pinch weld (the metal frame where the glass sits). We use specialized scraping chisels to trim the old urethane bead down to a uniform thickness of approximately 1-2 millimeters. This thin base layer acts as an excellent bonding surface for the new adhesive. We then use an alcohol-based, lint-free cleaner to wash away all dirt, grease, and microscopic glass dust from the pinch weld and the surrounding body channels.
Step 6: High-Performance Primer Application
If there are any micro-scratches on the metal frame exposing bare steel, we immediately treat them with a specialized anti-corrosion auto glass primer. This prevents future rust formation, which is the leading cause of late-stage auto glass leaks. We also apply a generous coat of black glass primer to the ceramic frit band (the black painted edge) of the brand-new replacement glass. This primer acts as an adhesion promoter, creating a molecular bond between the glass surface and the structural urethane.
Step 7: Extruding the Advanced Urethane Adhesive
We only use premium, fast-curing, OEM-grade polyurethane adhesive. Using a high-powered electric caulking gun, our Master Technicians extrude a continuous, perfectly uniform "V-bead" of urethane along the perimeter of the pinch weld. The V-shape is crucial; as the glass is pressed into place, the peak of the V collapses evenly, spreading out to eliminate any air pockets, gaps, or weak points that could cause wind noise or water ingress.
Step 8: Precision Installation of the New Sweeping Back Glass
The heavily curved back glass of the Hyundai IONIQ 6 requires flawless alignment on the very first try. Using heavy-duty pneumatic suction cups, two technicians carefully lift the new, OEM-quality tempered glass. We align the glass using factory reference pins and gently set it into the fresh urethane bed. We apply firm, even pressure around the entire perimeter to ensure the adhesive compresses perfectly against the glass. Specialized retention tape is then applied to hold the glass firmly in place while the urethane begins its initial chemical curing process.
Step 9: Reconnecting Defrosters and Reassembly
With the glass safely set, we move back to the vehicle's interior. We reconnect the electrical harnesses for the defroster lines and test the circuit with a multimeter to ensure full functionality. We then carefully re-install all interior tailgate trim panels, ensuring every clip snaps securely into its original position, restoring the interior to its factory finish.
Step 10: Final Multi-Point Inspection and Post-Install Vacuuming
Before handing the keys back to you, we conduct a final, rigorous inspection. We clean the newly installed back glass using premium, streak-free automotive glass cleaner. We perform one last sweep with the vacuum to guarantee the vehicle's interior is spotless. Finally, we brief the customer on the Safe Drive-Away Time (SDAT), ensuring the urethane has cured sufficiently to meet strict federal crash safety standards.
Choose AlexWindshield: Your Trusted GTA Auto Glass Experts
Replacing the intricate back glass on a cutting-edge EV like the 2023-2027 Hyundai IONIQ 6 requires a combination of technical mastery, specialized equipment, and unwavering dedication to safety. Attempting to cut corners with inferior materials or inexperienced technicians can result in severe water leaks, electrical shorts in your defroster system, or a complete loss of structural integrity in the event of an accident.
- Unmatched Local Expertise: We are proud to serve the entire Greater Toronto Area, offering rapid response times to clients in Vaughan, Richmond Hill, and Markham.
- Premium Mobile Service: You do not need to drive a compromised vehicle. We bring our state-of-the-art tools and inventory directly to your home or workplace.
- Meticulous Cleanup: We understand the frustration of broken tempered glass. Our comprehensive interior detailing guarantees your cabin is safe, clean, and completely free of glass shards.
- OEM-Quality Components: We source only top-tier glass that matches the strict aerodynamic, tint, and thermal specifications required for the Hyundai IONIQ 6.
At AlexWindshield, we don't just replace auto glass; we restore your peace of mind. We stand confidently behind our craftsmanship, which is why every installation we perform comes backed by our comprehensive Lifetime Warranty against leaks, wind noise, and manufacturer defects. Do not let a shattered back glass disrupt your driving experience or compromise your EV's efficiency.
Contact AlexWindshield today to schedule your mobile auto glass replacement, and let our Master Technicians get your Hyundai IONIQ 6 back on the road safely, seamlessly, and stylishly.




