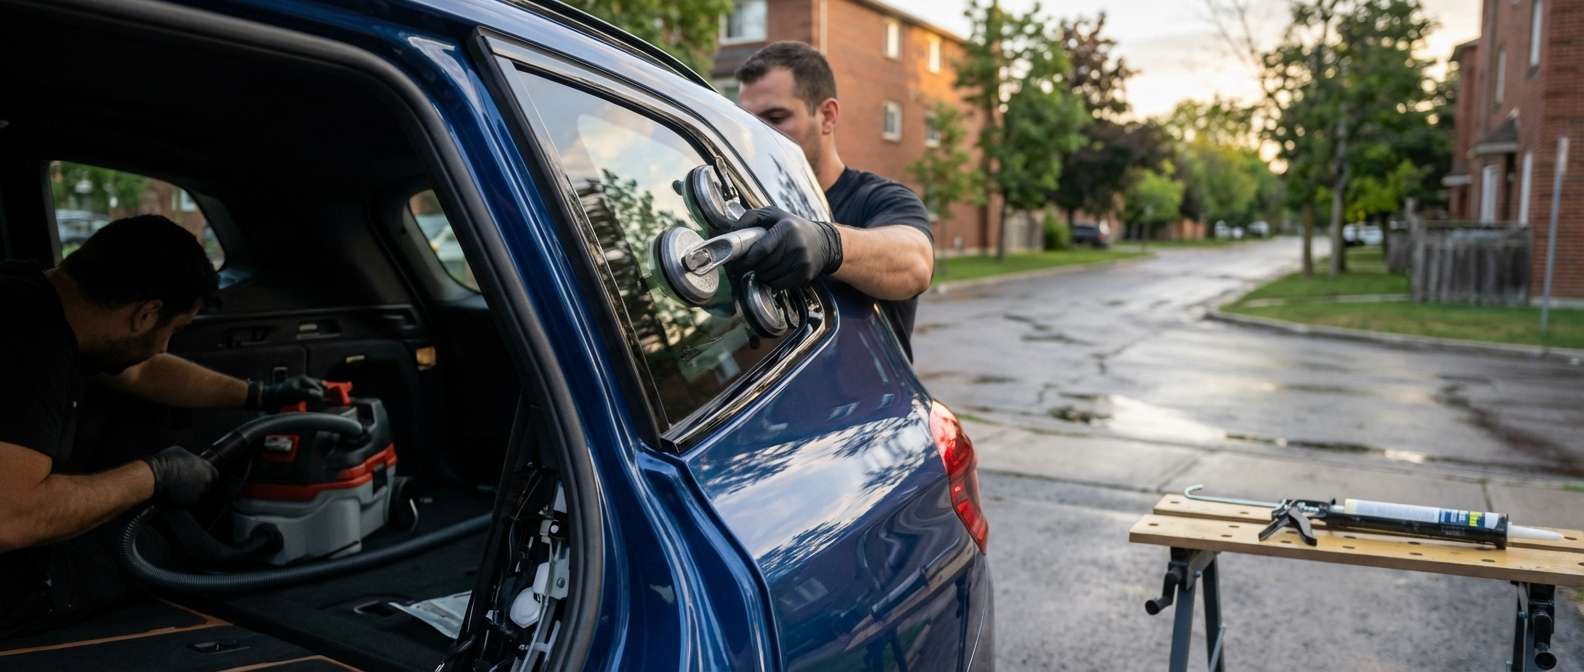
Precision Quarter Glass Replacement for BMW X3 (G01) 2018-2024
The BMW X3 (G01 generation) represents a pinnacle of Sports Activity Vehicle design, blending rugged utility with the sophisticated elegance synonymous with Bavarian engineering. However, the sleek lines of your vehicle—specifically the signature "Hofmeister kink" found in the rear quarter glass—are vulnerable to road debris, vandalism, or accidental impact. When this stationary glass panel shatters or cracks, it is not merely a cosmetic issue; it is a breach of your vehicle’s security and a compromise of its structural rigidity.
At AlexWindshield, we understand that a BMW requires a higher standard of care than a standard domestic sedan. Replacing the quarter glass on a 2018-2024 BMW X3 is a technically demanding procedure that involves navigating complex interior trim, side-curtain airbags, and specific bonding protocols. Serving the entire Greater Toronto Area (GTA), with a specialized focus on Vaughan, Richmond Hill, and Markham, our mobile units bring dealership-level expertise directly to your driveway.
Why Quarter Glass Integrity Matters on Your BMW X3
Unlike a door glass which moves up and down, the quarter glass (located on the body of the vehicle behind the rear doors) is a fixed, structural component. On the G01 chassis, this glass is bonded directly to the frame using high-strength urethane. It plays a critical role in:
- Structural Stiffness: The bonded glass contributes to the torsional rigidity of the vehicle body.
- Cabin Quietness: A proper seal prevents wind noise and water leaks, maintaining the silent luxury of the X3 cabin.
- Theft Prevention: This glass is frequently targeted by thieves to gain access to the trunk release or unlock buttons.
- Safety Systems: The quarter glass is situated near the C-pillar, often in close proximity to side-curtain airbag deployment zones.
Master Technician Guide: The Step-by-Step Replacement Process
As Master Technicians at AlexWindshield, we do not believe in "quick fixes." We adhere to a strict, OEM-compliant protocol to ensure your BMW X3 is returned to factory specifications. Below is the detailed, A to Z process we utilize for replacing the quarter glass on the G01 platform.
Step 1: Pre-Installation Inspection and Protection
Before touching the glass, we perform a 360-degree inspection of the damage. We document any pre-existing scratches on the paint or interior trim. Given the premium finish of the X3, protection is paramount. We apply high-grade collision wrap and protective tape around the exterior window frame to prevent accidental tool slippage from scratching the paint or the high-gloss "Shadowline" trim often found on M-Sport models. Inside, we cover the rear seats and cargo area with heavy-duty protective blankets.
Step 2: Interior Disassembly and Trim Removal
This is where the amateur is separated from the professional. To access the urethane bead safely, we must partially disassemble the interior C-pillar and cargo area trim.
- We carefully remove the interior cargo covers and C-pillar plastic cladding using non-marring nylon pry tools.
- This step is crucial to expose the metal pinch weld from the inside and to ensure we do not cut into the headliner or damage the side-curtain airbags during the cut-out process.
- On the BMW X3, there may be antenna wires or heating element connectors running near this area; we identify and isolate these to prevent electrical damage.
Step 3: Comprehensive Debris Removal and Vacuuming
Quarter glass is typically tempered safety glass. When it breaks, it explodes into thousands of small, cube-like shards that scatter throughout the vehicle. This is the most labor-intensive part of the job that many shops skip.
- Industrial Vacuuming: We use high-powered vacuums to extract glass from the seats, floor mats, and cargo area.
- Cavity Extraction: We insert flexible vacuum attachments into the door jambs, under the rear seats, and specifically inside the body panel cavity below the window. Failure to do this results in a "rattling" sound every time you turn a corner.
- Ventilation Check: We ensure no glass has fallen into the rear heating/cooling vents.
Step 4: Surgical Removal of the Old Glass and Adhesive
With the interior protected and debris removed, we proceed to remove the remaining glass perimeter and the old urethane. We utilize a specialized removal system—often a fiber line or cold knife—depending on how tight the gap is between the glass and the body.
For the BMW X3 G01, the tolerance is tight. We carefully slice through the existing urethane bead, ensuring the blade never touches the vehicle's metal frame (which causes rust) or the exterior trim. Once the seal is severed, the old unit is removed and discarded responsibly.
Step 5: Pinch Weld Preparation and Corrosion Prevention
The "pinch weld" is the metal shelf where the glass sits. It must be chemically pure for the new glue to hold.
- We trim the old urethane down to a thin, even layer (approximately 1-2mm). This acts as the best bonding surface for the new adhesive.
- Any minor scratches to the paint on the pinch weld (if they occur) are treated immediately with a black primer/inhibitor to prevent rust formation.
- We clean the bonding surface with a volatile cleaning agent to remove silicone, grease, and road oils.
Step 6: Primer Application and New Glass Preparation
We prepare the new quarter glass (OEM or OEE quality equivalent) by cleaning it with a specialized glass cleaner. We then apply an active glass primer to the ceramic band (the black frit) on the new glass. This chemical creates a molecular bridge between the glass and the urethane adhesive. We allow this to flash (dry) for the manufacturer-specified time, usually 2 to 10 minutes depending on humidity levels in the GTA.
Step 7: High-Modulus Urethane Application
We utilize only Sika or Dow automotive-grade urethane. For a BMW X3, we use a High-Modulus, Non-Conductive (HMNC) adhesive. "High Modulus" means the glue is stiffer, supporting the vehicle's structural integrity, while "Non-Conductive" ensures it does not interfere with the diversity antennas often embedded in BMW glass.
We apply the adhesive in a tall, V-shaped bead profile. This V-shape ensures that when the glass is pressed in, the glue collapses outward and inward evenly, guaranteeing a watertight seal without air pockets.
Step 8: Precision Installation and Reassembly
Using heavy-duty suction cups, we carefully position the new quarter glass into the frame. This requires steady hands to ensure the gaps around the chrome or black trim are perfectly symmetrical, matching the factory lines of the door and roof.
- We press the glass firmly to set the bond ("wet out" the adhesive).
- We secure the glass with retention tape to prevent it from sliding down while the glue cures.
- We reinstall the interior C-pillar trim, cargo liners, and weather stripping, ensuring all clips snap back into place securely.
- A final glass cleaning removes any fingerprints or smudge marks.
Service Availability: Vaughan, Richmond Hill, and Markham
AlexWindshield is deeply embedded in the local community. We know that driving a BMW X3 in the GTA means dealing with construction on Highway 7, debris on the 407, and the busy parking lots of Vaughan Mills or Markville Mall.
We offer Same-Day Mobile Service specifically tailored for:
- Vaughan: From Kleinburg to Woodbridge, our technicians can meet you at your home or office.
- Richmond Hill: Whether you are near Yonge Street or out by Oak Ridges, we have mobile units on standby.
- Markham: Serving Unionville, Cornell, and the business districts with rapid response times.
Our mobile vans are fully equipped workshops. We do not need to take your car to a shop; we bring the shop to you, complete with power generators and all necessary lighting and tools to perform a factory-grade installation onsite.
OEM Quality vs. Aftermarket Glass
For the BMW X3 (G01), the fit and finish are everything. A poorly manufactured aftermarket glass may have distorted optics, incorrect curvature, or moulding that does not align with the door trim. At AlexWindshield, we prioritize the use of Original Equipment Equivalent (OEE) glass. This glass is manufactured by the same factories (such as Pilkington, Saint-Gobain, or Fuyao) that supply BMW, ensuring that the tint color, heating elements, and acoustical properties match your original specifications perfectly.
Conclusion: The AlexWindshield Guarantee
Your BMW X3 is an investment in performance and safety. Do not compromise that investment by choosing a budget glass shop that skips the critical preparation steps or fails to clean up the dangerous glass shards inside your vehicle. Trust the Master Technicians at AlexWindshield to restore your vehicle to its showroom condition.
We stand behind our craftsmanship with an industry-leading Lifetime Warranty on leakage and workmanship for as long as you own the vehicle. If you are in the Greater Toronto Area and require professional quarter glass replacement, contact us today.
Drive with confidence. Drive with AlexWindshield.




